Jack Skellington Pie: Your Ultimate Guide to a Spooky & Delicious Halloween Dessert
Some of the most delightful creations stem from moments of pure, relaxed inspiration. It was a tranquil Sunday, marking my birthday, and my sole wish was to remain comfortably wrapped in my pajamas. As my partner W and I casually scrolled through Instagram, a captivating image caught our eyes: a perfectly crafted Jack Skellington pie. The decision was instantaneous and unanimous – we simply had to make one ourselves! With David Bowie’s iconic tunes setting a vibrant backdrop, we immersed ourselves in a baking adventure that promised far more joy and considerably less mess than the traditional ritual of scooping “guck” out of a pumpkin. This wasn’t merely about baking a dessert; it was about celebrating a special day, embracing creativity, and forging a deliciously spooky new tradition.
The charm of a homemade pie, especially one that pays homage to “The Nightmare Before Christmas,” extends far beyond its exquisite taste. It transforms into an edible work of art, a guaranteed conversation starter, and an ingenious way to infuse the festive spirit of Halloween into your home without the slimy aftermath of pumpkin carving. Our kitchen quickly became a hub of creativity, soon filled with the enticing aromas of sweet berries and warm, flaky crust. This welcoming scent offered a stark and much-appreciated contrast to the usual carving tools and discarded pumpkin pulp. It was, without a doubt, a perfect way to spend a birthday, seamlessly blending relaxation with the exhilarating satisfaction of a fun, hands-on project.

The Spark of Inspiration: From Social Media Scroll to Halloween Masterpiece
Inspiration, as we’ve learned, can emerge from the most unexpected places. For us, it was the vibrant, ever-scrolling feed of Instagram. When that artfully designed Jack Skellington pie appeared on our screens, we knew instantly that we had discovered our next baking quest. The idea of meticulously recreating the Pumpkin King’s iconic face in a sweet, edible form was utterly irresistible. It was one of those shared “we absolutely HAVE to do this!” moments that set our creative gears in motion. Our approach was less about adhering to a strict, complicated recipe and more about embracing an open-ended creative process, allowing us to infuse our unique touch into this beloved Halloween motif.
Selecting the perfect soundtrack for our baking escapade was an essential element of the experience. Who better than the legendary David Bowie to accompany such a wonderfully eccentric and creative endeavor? His diverse and inspiring music provided the ideal backdrop as we meticulously measured ingredients, carefully mixed our dough, and artfully molded the crust. This wasn’t merely a baking session; it was an immersive experience, a delightful rebellion against the mundane, and a joyous celebration of shared creativity. It perfectly captured the essence of a relaxed birthday Sunday, effortlessly transforming it into a memorable, productive, and ultimately, a delectable day.
Crafting the Perfect Pie Crust for Your Spooky Creation
Every truly exceptional pie begins with an equally exceptional crust. For our Jack Skellington masterpiece, a sturdy yet tender and flaky pie crust is not only crucial for encasing the delicious filling but also serves as the ideal canvas for bringing Jack’s iconic features to life. You have the option of using a high-quality, store-bought pastry crust for convenience, which can be a real time-saver, particularly if you’re eager to focus your energy on the intricate decorative aspects. However, for those with a bit more time and a passion for baking, a homemade all-butter or butter-shortening blend crust offers an unparalleled richness and delicate texture that truly elevates the entire pie experience.
If you choose to embark on the journey of making your own crust from scratch, remember that the secret to achieving a tender, flaky texture lies in using very cold fat (whether butter or shortening) and handling the dough as minimally as possible. Begin by cutting your chilled fat into small cubes and quickly incorporating it into your flour mixture, then add ice-cold water gradually until the dough just comes together. Be careful not to overmix! Once formed, chill the dough for at least 30 minutes before you even think about rolling it out. This vital step ensures the butter remains cold, which in turn creates those beautiful pockets of steam during baking that result in an irresistibly flaky crust. For your Jack Skellington pie, you’ll need two distinct portions of dough: one for the base crust and another for the top crust, which will be transformed into his instantly recognizable face.
Bringing Jack’s Face to Life: The Art of Precision Design
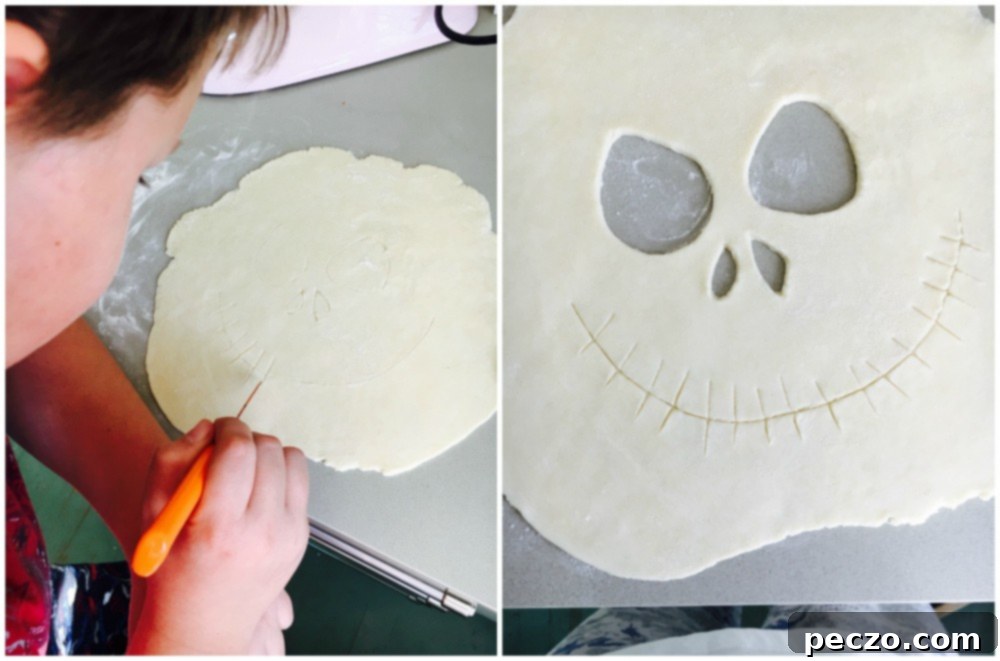
This is undeniably where the true magic of your Jack Skellington pie unfolds! Once your bottom crust is perfectly settled into your pie plate and generously filled with your chosen deliciousness, it’s time to prepare the top crust for its iconic transformation into Jack’s face. Begin by rolling out your second disc of pie dough to a uniform thickness of approximately 1/8 inch. Using a very sharp paring knife, carefully cut out Jack’s distinctive eyes, nose, and that famous stitched smile. There are a few creative approaches you can take to achieve this:
- Freehand Artistic Approach: For those who feel confident in their artistic abilities, you can gently sketch the shapes onto the rolled-out dough with the tip of your knife before making the final cuts. Jack’s eyes are typically depicted as elongated ovals or almond shapes, his nose as two small, inverted “V”s, and his mouth as a wide, friendly, stitched grin.
- Template Precision Method: If you prefer a more precise outcome, simply find a clear image of Jack Skellington’s face online, print it out, and use it as a practical guide. You can even cut out the individual shapes from the paper and carefully place them onto your rolled-out dough to trace around them before cutting.
- Cookie Cutter Assistance (for specific shapes): While not strictly necessary, small almond-shaped or oval cookie cutters can be incredibly useful for creating uniform eyes. A tiny triangle cutter could also work for the nose, simplifying these particular details. For the mouth, a steady hand with your paring knife for the long smile, followed by small dash marks for the stitches, usually yields the best results.
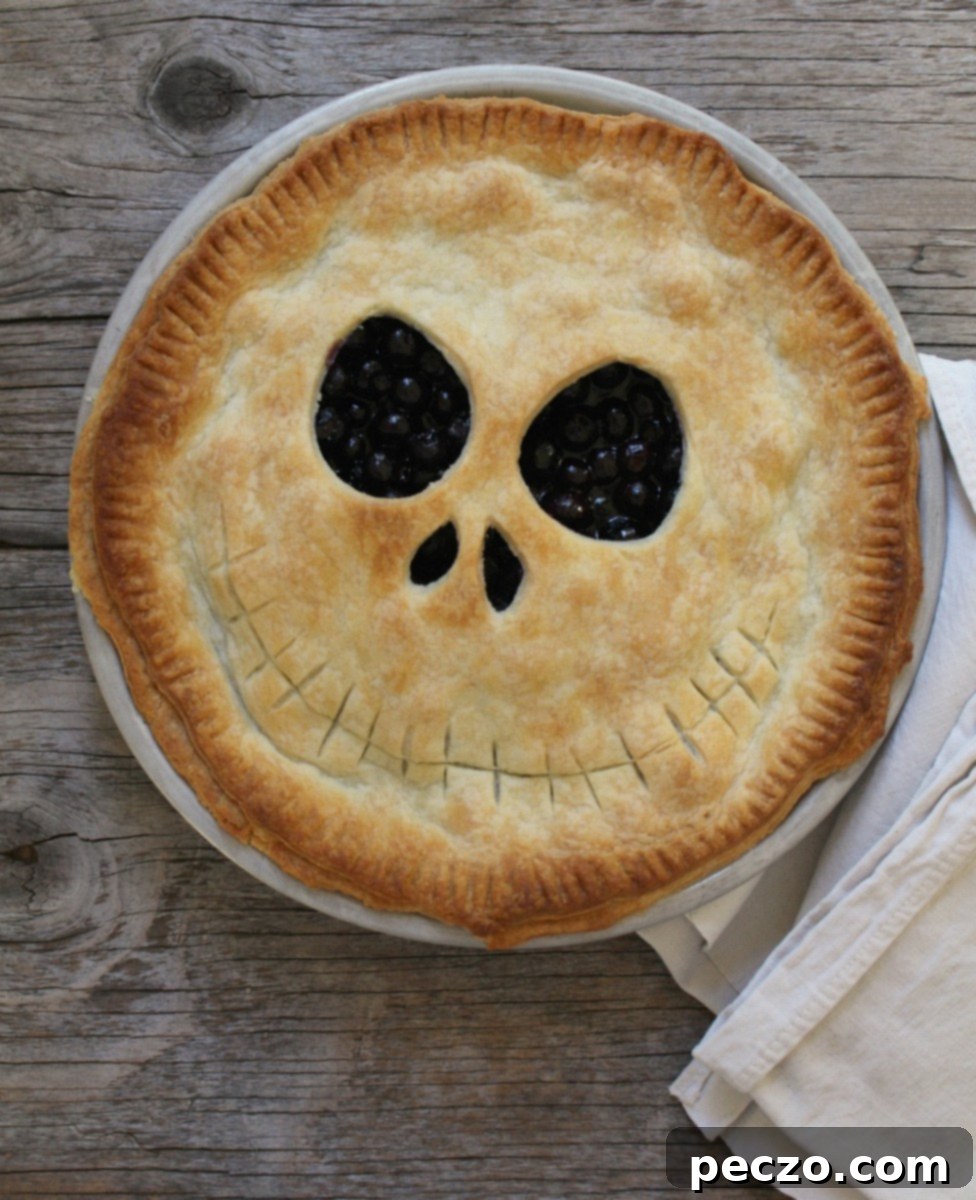
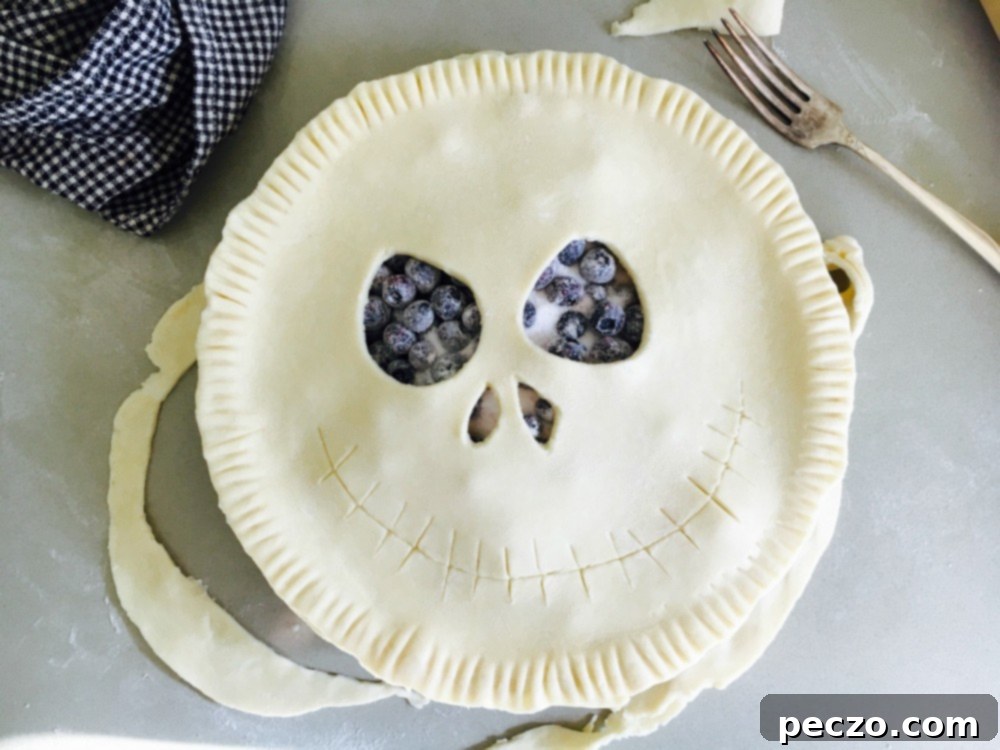
Once you’ve meticulously cut out all of Jack’s features, carefully transfer this delicate, cut-out top crust onto your filled pie. Gently crimp the edges of both the top and bottom crusts together to create a secure seal around the entire pie. You can fashion a classic fluted edge with your fingers or opt for a simpler, rustic design using the tines of a fork. The negative space created by these precise cut-outs will beautifully reveal the dark, brooding berry filling beneath, instantly giving your pie its signature, spooky Jack Skellington appearance.
The Filling: A Deep Dive into Dark Berry Deliciousness
For achieving Jack Skellington’s signature “brooding eyes” and overall dark, mysterious aesthetic, a rich, dark berry filling is an absolutely perfect choice. For our pie, we utilized a delightful combination of blueberries and saskatoons, which we conveniently had stored in the freezer. These berries provided an incredible depth of both color and flavor. However, the true beauty of this pie lies in its versatility – virtually any dark fruit filling will work wonderfully. Consider using ripe blackberries, luscious dark cherries, or a vibrant mixed berry blend that could include raspberries and boysenberries for a similarly striking visual and flavorful effect.
Cooked vs. Uncooked Filling: A Crucial Decision for Perfection
Initially, I chose to use an uncooked filling, hoping to streamline the baking process. While still tasty, I’ve often found that uncooked fruit fillings, particularly those where cornstarch or flour is directly incorporated without prior cooking, can sometimes develop a slightly starchy or gummy aftertaste. For an undeniably superior pie experience, I now highly recommend pre-cooking your filling. Here’s why this step, though it adds a little time, makes a significant difference:
- Enhanced Texture and Flavor: Cooking your chosen berries with sugar and a thickening agent (such as cornstarch or tapioca flour) on the stovetop allows the starches to fully activate and properly thicken. This process eliminates that undesirable raw, starchy taste and ensures all the flavors meld together harmoniously.
- Optimal Consistency and Clean Slices: A pre-cooked filling is far less likely to bubble over excessively in the oven, and it will set much more consistently once cooled. This results in beautiful, clean slices that hold their shape perfectly.
- Bursting Freshness: As a final touch after the filling has cooked and slightly cooled, stir in a handful of fresh blueberries (if available) just before pouring the mixture into your pie crust. These fresh berries will gently burst with juice as the pie bakes, creating delightful “pops of juice” and adding a brighter, fresher berry flavor contrast to the cooked fruit.
To prepare your cooked filling: In a medium saucepan, combine your selected berries (whether frozen or fresh), sugar (adjust the amount to your personal sweetness preference and the tartness of your berries), a suitable thickener (typically 2-3 tablespoons of cornstarch or tapioca flour per 6 cups of berries), a small squeeze of lemon juice (to brighten and enhance the fruit flavors), and an optional pinch of warming spices like cinnamon or nutmeg. Cook this mixture over medium heat, stirring frequently, until it visibly thickens and begins to gently bubble. Once it reaches this point, remove it from the heat and allow it to cool slightly before carefully spooning it into your prepared pie crust. This seemingly small step significantly elevates the final quality of your Jack Skellington pie, ensuring a perfectly set, deliciously flavored filling.

Baking Your Jack Skellington Masterpiece to Perfection
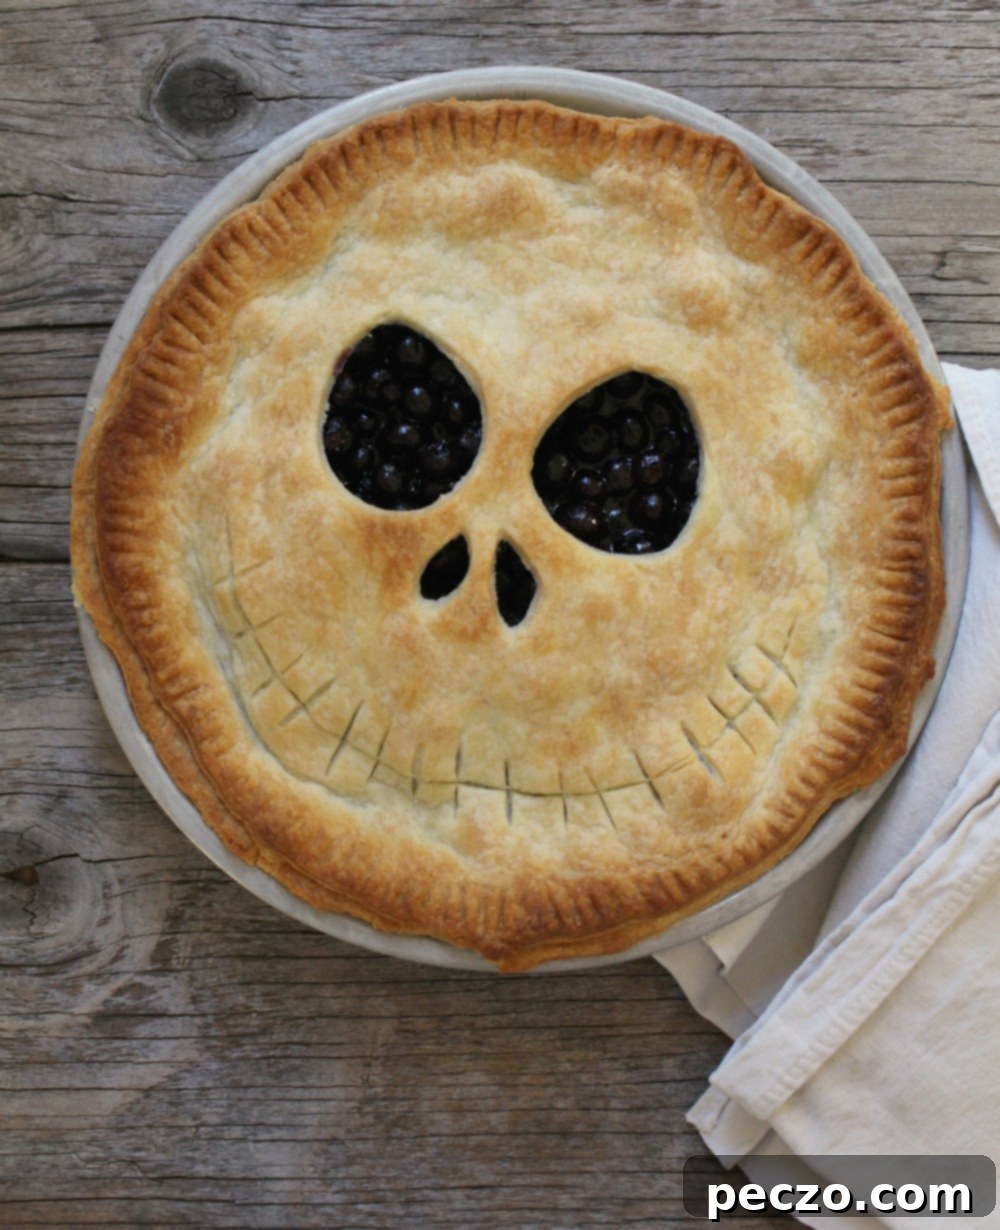
Once your Jack Skellington pie is meticulously assembled, it’s ready for its dramatic transformation in the heat of the oven. Begin by preheating your oven to 400°F (200°C). For added peace of mind and to catch any potential drips (especially if you opted for an uncooked filling), place your pie on a sturdy baking sheet. Bake the pie at this initial higher temperature for 15-20 minutes. This burst of heat helps to set the crust beautifully and initiates the bubbling of the filling. After this initial phase, reduce the oven temperature to 375°F (190°C) and continue baking for an additional 35-45 minutes. The pie is perfectly done when its crust is a gorgeous golden brown and the filling is visibly bubbling invitingly through Jack’s eyes and mouth. Should the edges of your pie crust begin to brown too quickly, you can gently protect them by covering them with strips of aluminum foil.
After removing your spectacular pie from the oven, it’s absolutely crucial to allow it to cool completely on a wire rack before attempting to slice and serve. This vital cooling period permits the filling to fully set, preventing any dreaded runny messes and ensuring you achieve beautiful, clean slices. The anticipation that builds while waiting for it to cool is, in itself, almost as much fun and rewarding as the actual baking process!
A New Halloween Tradition: Fun, Spooky, and Utterly Delicious!
The sheer joy derived from both creating and ultimately devouring this magnificent Jack Skellington pie is, quite frankly, immeasurable. It has effortlessly claimed its rightful place as our new, cherished traditional Halloween dinner dessert, following our annual “Meat Hand” – a delightfully gruesome, yet incredibly tasty, meatloaf creation that perfectly complements the spooky theme of the evening. There’s an undeniable and profound satisfaction that comes from crafting such a festive and uniquely themed treat from scratch, especially one that infuses so much character, whimsy, and fun into the holiday table.
This Jack Skellington pie is far more than just a dessert; it’s a memorable experience. It perfectly embodies the playful and imaginative spirit of Halloween, actively encouraging creativity in the kitchen and bringing wide smiles to faces of all ages. It serves as a fantastic, wholesome alternative to the usual candy overload, offering a homemade delight that flawlessly aligns with the spooky season’s charm. Imagine the delight of serving this alongside other thoughtfully themed dishes – it truly elevates the entire Halloween dinner experience into something uniquely memorable and deeply personal.
Expert Tips for Success & Creative Variations
To ensure your Jack Skellington pie is a howling success and delights everyone at your Halloween gathering, here are a few extra expert tips and creative variations:
- Keep Your Dough Chilled: Always prioritize working with cold pie dough. If your dough starts to become too warm, soft, and sticky while you’re meticulously cutting Jack’s face, simply pop it back into the refrigerator for 10-15 minutes to firm it up.
- The Perfect Egg Wash: For a beautifully golden-brown, glossy, and professional-looking crust, gently brush the top crust (being careful to avoid the filling in the cut-outs) with an egg wash. This is typically one egg beaten with a tablespoon of water or milk, applied just before baking.
- Strategic Vent Holes (Optional but Recommended): Even with the natural vent openings from Jack’s face, if your pie crust seems particularly sealed, consider adding a few tiny, inconspicuous vent holes on the top crust. This allows steam to escape efficiently, preventing a soggy bottom crust.
- Embrace a Savory Skellington: Feeling exceptionally adventurous? Why not experiment with a savory Jack Skellington pie! Imagine a rich, creamy chicken pot pie filling or a hearty dark beef stew, all topped with a flaky pastry crust meticulously carved into Jack’s iconic face. It makes for an incredibly unique and spooky dinner entrée!
- Delightful Mini Pies: For individual servings or a party-friendly option, use individual pie molds or even a muffin tin to create charming mini Jack Skellington pies. These are perfect for party favors or easy-to-grab treats.
Embrace the Spirit of Homemade Halloween!
From a simple, inspiring scroll through Instagram to the creation of a delicious new annual tradition, our Jack Skellington pie adventure was an undeniable and resounding success. It stands as a testament to the fact that with just a little bit of inspiration, some fantastic background music, and a genuine willingness to get wonderfully creative, you can effortlessly transform an ordinary Sunday into something truly extraordinary and deeply special. This pie is so much more than just a mere dessert; it’s a vibrant celebration of imagination, the pure joy of homemade baking, and the enchanting, magical spirit of Halloween. So, gather your ingredients, queue up your favorite tunes, and prepare to bake a spooky masterpiece that is sure to be the unforgettable highlight of your next festive feast!
